Customizing your Glue environment#
Using a config.py file as described in Configuring Glue via a startup file, you can
customize many aspects of your Glue environment, which are described in the
following sections.
Registries#
Before we talk about the different components of the Glue environment that you
can customize, we first need to look at registries. Glue is written so as to
allow users to easily register new data viewers, tools, exporters, and more.
Registering such components can be done via registries located in the
glue.config sub-package. Registries include for example link_function,
data_factory, colormaps, and so on. As demonstrated below, some
registries can be used as decorators (see e.g. Custom Link Functions)
and for others you can add items using the add method (see e.g. Custom
Colormaps).
In the following sections, we show a few examples of registering new functionality, and a full list of available registries is given in Complete list of registries.
Custom Link Functions#
From the Link Data Dialog, you inform Glue how to convert between quantities among different data sets. You do this by selecting a translation function, and specifying which data attributes should be treated as inputs and outputs. You can use the configuration file to specify custom translation functions. Here’s how:
from glue.config import link_function


@link_function(info="Link from deg to rad", output_labels=['rad'])
def deg_to_rad(deg):
    return deg * 3.14159 / 180
- Some remarks about this code:
link_functionis used as a decorator. The decorator adds the function to Glue’s list of link functionsWe provide a short summary of the function in the
infokeyword, and a list ofoutput_labels. Usually, only one quantity is returned, sooutput_labelshas one element.Glue will always pass numpy arrays as inputs to a link function, and expects a numpy array (or a tuple of numpy arrays) as output
With this code in your configuration file, the deg_to_rad function is
available in the Link Data dialog:

This would allow you to link between two datasets with different conventions for specifying angles.
Custom Data Loaders#
Glue lets you create custom data loader functions, to use from within the GUI.
Here’s a quick example: the default image loader in Glue reads each color in
an RGB image into 3 two-dimensional attributes. Perhaps you want to be able
to load these images into a single 3-dimensional attribute called cube.
Here’s how you could do this:
from glue.config import data_factory
from glue.core import Data
from skimage.io import imread

def is_jpeg(filename, **kwargs):
    return filename.endswith('.jpeg')

@data_factory('3D image loader', is_jpeg)
def read_jpeg(file_name):
    im = imread(file_name)
    return Data(cube=im)
Let’s look at this line-by-line:
The is_jpeg function takes a filename and keywords as input, and returns True if a data factory can handle this file
The
@data_factorydecorator is how Glue “finds” this function. Its two arguments are a label, and the is_jpeg identifier functionThe first line in
read_jpeguses scikit-image to load an image file into a NumPy array.The second line constructs a Data object from this array, and returns the result.
If you put this in your config.py file, you will see a new
file type when loading data:

If you open a file using this file type selection, Glue will pass the path of this file to your function, and use the resulting Data object.
If you are defining a data factory that may clash with an existing one, for
example if you are defining a loader for a specific type of FITS file, then
make sure that the identifier function (e.g. is_jpeg above) returns True
only for that specific subset of FITS files. Then you can set the priority=
keyword in the @data_factory decorator. The value should be an integer or
floating-point number, with larger numbers indicating a higher priority.
For more examples of custom data loaders, see the example repository.
Custom importers#
The Custom Data Loaders described above allow Glue to recognize more file formats than originally implemented, but it is also possible to write entire new ways of importing data, including new GUI dialogs. An example would be a dialog that allows the user to query and download online data.
Currently, an importer should be defined as a function that returns a list of
Data objects. In future we may relax this latter
requirement and allow existing tools in Glue to interpret the data.
An importer can be defined using the @importer decorator:
from glue.config import importer
from glue.core import Data

@importer("Import from custom source")
def my_importer():
    # Main code here
    return [Data(...), Data(...)]
The label in the @importer decorator is the text that will appear in the
Import menu in Glue.
Custom Data/Subset Exporters#
Note
This section is about exporting the numerical values for datasets and subsets. To export the masks for subsets, see Custom subset mask importers and Custom subset mask exporters.
In addition to allowing you to create custom loaders and importers, glue lets you create custom exporters for datasets and subsets. These exporters can be accessed by control-clicking on specific datasets or subsets:
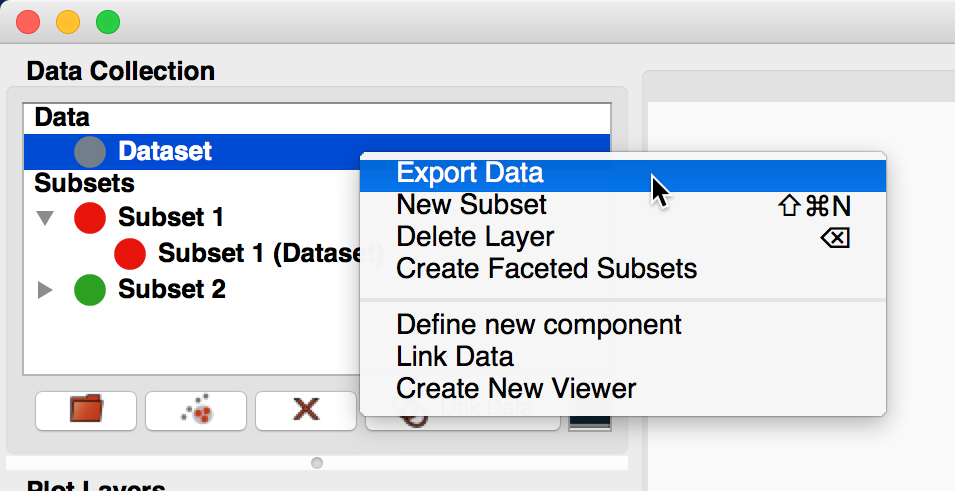
and selecting Export Data or Export Subsets.
A custom exporter looks like the following:
from glue.config import data_exporter

@data_exporter('My exporter')
def export_custom(filename, data):
   # write out the data here
The data argument to the function can be either a
Data or a Subset object, and
filename is a string which gives the file path. You can then write out the
file in any way you like. Note that if you get a
Subset object, you should make sure you export the
data subset, not just the mask itself. For e.g. 2-dimensional datasets, we find
that it is more intuitive to export arrays the same size as the original data
but with the values not in the subset masked or set to NaN.
Custom subset mask importers#
When right-clicking on datasets or subsets, it is possible to select to import
subset masks from files (as well as export them). To define a new importer
format, use the @subset_mask_importer decorator:
from glue.config import subset_mask_importer

@subset_mask_importer(label='My Format')
def my_subset_mask_importer(filename):
    # write code that reads in subset masks here
The function should return a dictionary where the labels are the names of the
subsets, and the values are Numpy boolean arrays. The @subset_mask_importer
decorator can also take an optional extension argument that takes a list of
extensions (e.g. ['fits', 'fit']).
Custom subset mask exporters#
When right-clicking on datasets or subsets, it is also possible to select to
export subset masks to files. To define a new exporter format, use the
@subset_mask_exporter decorator:
from glue.config import subset_mask_exporter

@subset_mask_exporter(label='My Format')
def my_subset_mask_exporter(filename, masks):
    # write code that writes out subset masks here
The masks argument will be given a dictionary where each key is the name of
a subset, and each value is a Numpy boolean array. The @subset_mask_exporter
decorator can also take an optional extension argument that takes a list of
extensions (e.g. ['fits', 'fit']).
Custom Colormaps#
You can add additional matplotlib colormaps to Glue’s image viewer by adding
the following code into config.py:
from glue.config import colormaps
from matplotlib.cm import Paired
colormaps.add('Paired', Paired)
Custom Stretches#
You can add additional stretches for use in e.g. the image viewer. Stretches should be
provided as a function or an initialized class with a __call__ method which takes
values in the range [0:1] and return values in the range [0:1], and takes an optional
out= keyword argument. If this is set, the array values should be modified in-place
and the output array should be returned:
from glue.config import stretches

def cbrt(x, out=None):
    if out is not None:
        out[:] = out ** 1/3
        return out
    else:
        return x ** 1/3

stretches.add('cbrt', cbrt, display='Cube root')
The display= argument can optionally be used to specify the name to use in drop-down menus.
Custom Actions#
You can add menu items to run custom functions when selecting datasets, subset
groups or subsets in the data collection. To do this, you should define a
function to be called when the menu item is selected, and use the
@layer_action decorator:
from glue_qt.config import layer_action

@layer_action('Do something')
def callback(selected_layers, data_collection):
    print("Called with %s, %s" % (selected_layers, data_collection))
The layer_action decorator takes an optional single keyword argument
that can be set to True or False to indicate whether the action should only
appear when a single dataset, subset group, or subset is selected. If single
is True, the following keyword arguments can be used to further control when
to show the action:
data: only show the action when selecting a datasetsubset_group: only show the action when selecting a subset groupsubset: only show the action when selecting a subset
These default to False, so setting e.g.:
@layer_action('Do something', single=True, data=True, subset=True)
...
means that the action will appear when a single dataset or subset is selected but not when a subset group is selected.
The callback function is called with two arguments. If single is True, the
first argument is the selected layer, otherwise it is the list of selected
layers. The second argument is the
DataCollection object.
Custom Preference Panes#
You can also add custom panes in the Qt preferences dialog. To do this, you
should create a Qt widget that encapsulates the preferences you want to
include, and you should make sure that this widget has a finalize method
that will get called when the preferences dialog is closed. This method should
then set any settings appropriately in the application state. The following is
an example of a custom preference pane:
from glue_qt.config import settings, preference_panes
from qtpy import QtWidgets
class MyPreferences(QtWidgets.QWidget):
def __init__(self, parent=None):
super(MyPreferences, self).__init__(parent=parent)
self.layout = QtWidgets.QFormLayout()
self.option1 = QtWidgets.QLineEdit()
self.option2 = QtWidgets.QCheckBox()
self.layout.addRow("Option 1", self.option1)
self.layout.addRow("Option 2", self.option2)
self.setLayout(self.layout)
self.option1.setText(settings.OPTION1)
self.option2.setChecked(settings.OPTION2)
def finalize(self):
settings.OPTION1 = self.option1.text()
settings.OPTION2 = self.option2.isChecked()
settings.add('OPTION1', '')
settings.add('OPTION2', False, bool)
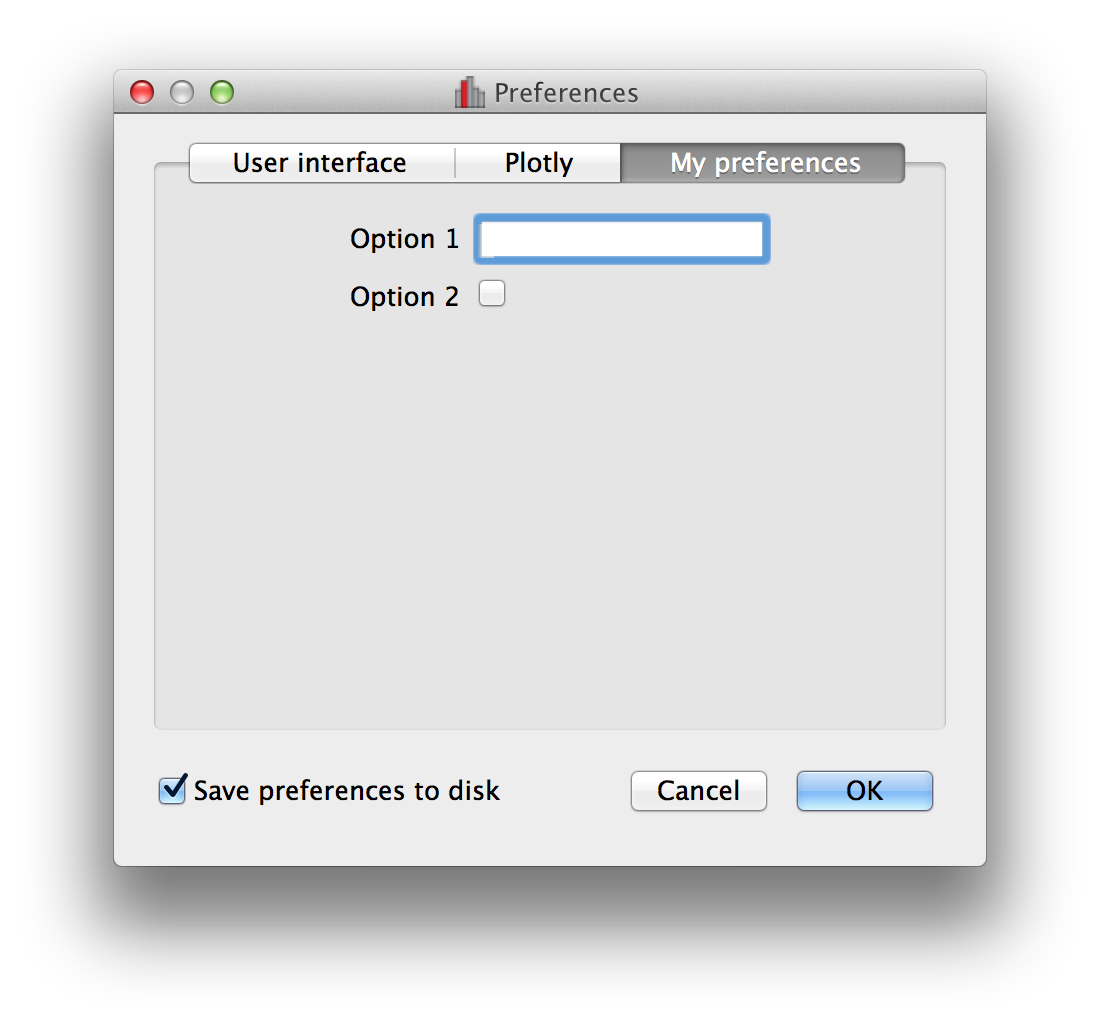
preference_panes.add('My preferences', MyPreferences)
This example then looks this the following once glue is loaded:
Custom fixed layout tab#
Note
this feature is still experimental and may change in future
By default, the main canvas of glue is a free-form canvas where windows can be
moved around and resized. However, it is also possible to construct fixed
layouts to create ‘dashboards’. To do this, you should import the qt_fixed_layout_tab
object:
from glue.config import qt_fixed_layout_tab
then use it to decorate a Qt widget that should be used instead of the free-form canvas area, e.g.:
@qt_fixed_layout_tab
def MyCustomLayout(QWidget):
    pass
The widget can be any valid Qt widget - for instance it could be a widget with a grid layout with data viewer widgets in each cell.
Custom startup actions#
It is possible to define actions to be carried out in glue once glue is open
and the data has been loaded. These should be written using the
startup_action decorator:
from glue.config import startup_action

@startup_action("action_name")
def my_startup_action(session, data_collection):
    # do anything here
    return
The function has access to session, which includes for example
session.application, and thus gives access to the full state of glue.
Startup actions have to then be explicitly specified using:
glue --startup=action_name
and multiple actions can be given as a comma-separated string.
Custom layer artist makers#
In some cases, one may want to override the default layer artist classes used by specific viewers. For example, for a particular data object, one may want to show a tree or network on top of an image.
This can be done by defining a function and decorating it with the
layer_artist_maker decorator:
@layer_artist_maker('custom_maker')
def custom_maker(viewer, data_or_subset):
    ...
The function should take two arguments - the first argument is the viewer to
which the data is being added, and the second is the
Data or Subset object to be
added. The function should then either return a custom
LayerArtist instance, or None if
the function does not need to override the default layer artists.
Note that layer_artist_maker can take an optional priority= argument
(which should be an integer), where higher values indicate that the layer artist
maker should be considered first.
Custom auto-linking helper#
It is possible to create functions that will automatically suggest links based
on the available data. To do so, use the autolinker decorator as follows:
from glue.config import autolinker

@autolinker('Auto-linker name')
def my_autolinker(data_collection):

    ...

    return links
The function should take a reference to a
DataCollection and should return a list of new
links that could be added. These will then automatically be suggested to the
user when new data are added. Note that it is your responsibility to ensure
that links that currently exist (and are in data_collection.external_links)
are not suggested.
Custom translation to native data objects#
Glue includes infrastructure to make it easy to convert between glue
Data objects and non-glue-specific data containers,
such as pandas DataFrame. You can define your own converter
by writing a class that has to_data and to_object methods, and
register this class with @data_translator, e.g.:
from glue.config import data_translator

@data_translator(MyDataClass)
class MyDataClassHandler:

    def to_data(self, obj):
        # This should take a MyDataClass object 'obj' and convert it to a
        # glue Data object.
        ...
        return data

    def to_object(self, data):
        # This should take a glue Data or Subset object and convert it to
        # a MyDataClass object.
        ...
        return obj
With this defined, you should then be able to add objects of type
MyDataClass to the data collection and get them back using
get_object() and
get_subset_object(), e.g.:
>>> data_collection['mydata'] = MyDataClass(...)
>>> data = data_collection['mydata']
>>> data
Data(...)
>>> data.get_object()
MyDataClass(...)
>>> data.get_subset_object(subset_id=0)
MyDataClass(...)
Custom translation of subset definitions to native data objects#
In the above section, we showed how
get_subset_object() can be used to get non-glue data
objects for a given subset - that is, a dataset with just the relevant subset of
values. However in some cases you may also want to have ways of converting the
conceptual definition of subsets to non-glue objects or to string
serializations. To do this, you should write a class that has a to_object
method and register the class using the @subset_definition_translator
decorator, e.g.:
from glue.config import subset_definition_translator

@subset_definition_translator('my-serialized-format')
class SimpleSerializer:

    def to_object(self, subset):

        # This should take a glue subset and translate the subset state,
        # which is accessible from subset.subset_state, to a non-glue
        # object that represents the selection - this could either be
        # a string or bytes serialization, or a different kind of
        # object that represents selections.

        ...

        return selection_definition
With this defined, you should then be able to extract subsets with this converter
using
get_selection_definition(), e.g.:
>>> data.get_selection_definition(subset_id='subset 1',
                                  format='my-serialized-format')
"a > 3"
Custom session patch#
Adding new features and keeping backward compatibility is hard. Because the features of glue, and/or its plugins changes over time, old but precious sessions files might not open anymore. To solve this problem, custom patch functions can be provided to edit in-place the session file, just after it is loaded. These patch functions should take a loaded session file (as a dict), detect if it is invalid, and if so correct the problem, e.g.:
from glue.config import subset_definition_translator

@session_patch(priority=0)
def correct_bad_version_plugin(session_obj):
    # if problem:
        # correct problem

    ...

    return
Complete list of registries#
A few registries have been demonstrated above, and a complete list of main
registries are listed below. All can be imported from glue.config - each
registry is an instance of a class, given in the second column, and which
provides more information about what the registry is and how it can be used.
Registry name |
Registry class |
|---|---|
|
|
|
|
|
|
|
|
|
|
|
|
|
|
|
|
|
|
|
|
|
|
|
|
|
|
|
|
|
|
|
|
|
|
|
|
|
|
|
Deferring loading of plug-in functionality (advanced)#
In some cases, you may want to defer the loading of your component/functionality until it is actually needed. To do this:
Place the code for your plugin in a file or package that could be imported from the
config.py(but don’t import it directly - it just has to be importable)Include a function called
setupalongside the plugin, and this function should contain code to actually add your custom tools to the appropriate registries.In
config.py, you can then add the plugin file or package to a registry by using thelazy_addmethod and pass a string giving the name of the package or sub-package containing the plugin.
Imagine that you have created a data viewer MyQtViewer. You could
directly register it using:
from glue_qt.config import qt_client
qt_client.add(MyQtViewer)
but if you want to defer the loading of the MyQtViewer class, you can
place the definition of MyQtViewer in a file called e.g.
my_qt_viewer.py that is located in the same directory as your
config.py file. This file should look something like:
class MyQtViewer(...):
    ...

def setup():
    from glue_qt.config import qt_client
    qt_client.add(MyQtViewer)
then in config.py, you can do:
from glue_qt.config import qt_client
qt_client.lazy_add('my_qt_viewer')
With this in place, the setup in your plugin will only get called if the
Qt data viewers are needed, but you will avoid unnecessarily importing Qt if
you only want to access glue.core.